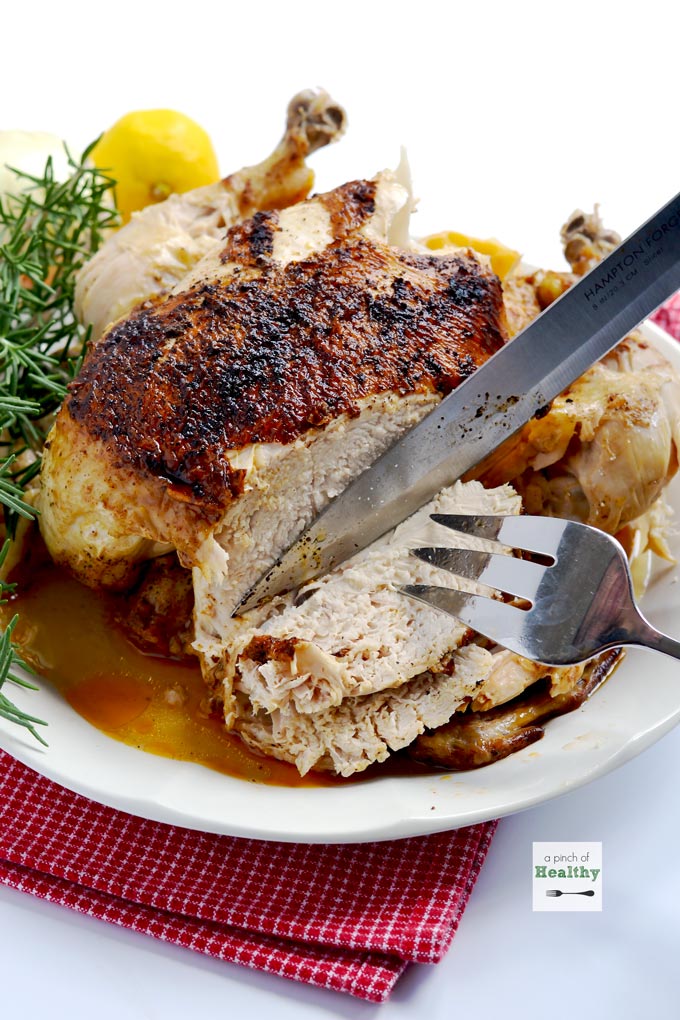
All you need is about 45 minutes to have this amazing, tender, juicy Instant Pot whole rotisserie chicken. Your whole family will LOVE it!

Note: This post contains Amazon affiliate links. See my full affiliate disclosure policy here.
You can totally make this “rotisserie” chicken fake-out in your Instant Pot. It is practically fool-proof. And it is just so much better than the store-bought kind.
I even crisp up the skin first to give it that rotisserie feel. I use the instant pot’s sauté setting to do that, and then I flip it over and add a little chicken stock before cooking it on the manual pressure setting.
Plus, I love that you can control the quality of ingredients that you use to make this.
It is perfectly tender and juicy…and ready in about 45 minutes.
How to make Instant Pot Rotisserie Chicken
First, gather your ingredients.
Ingredients
For tastiest results, always use the best quality ingredients you have access to.
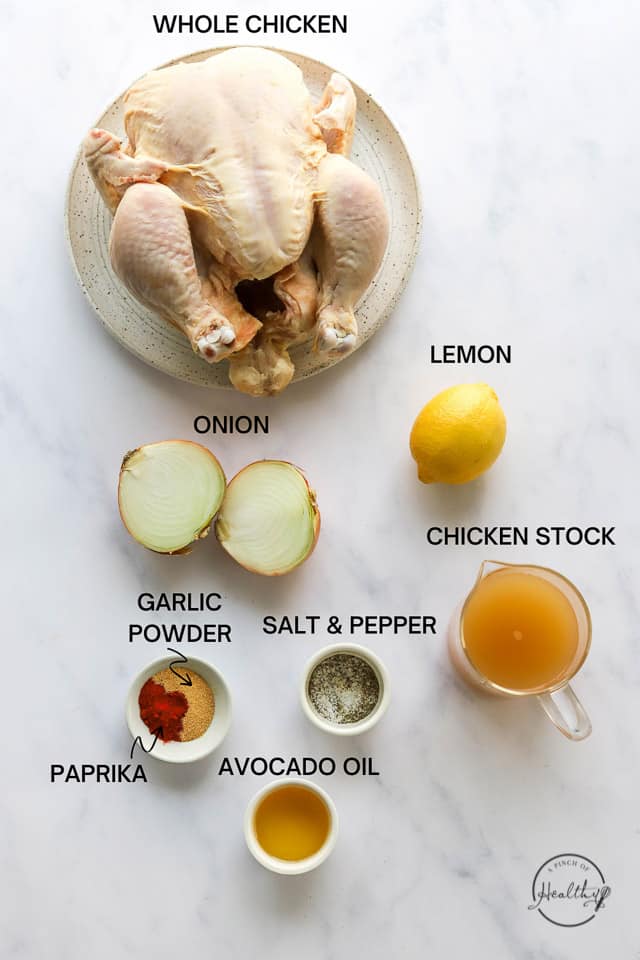
To make this Instant Pot “rotisserie” chicken recipe, you will need the following:
- whole chicken
- salt & pepper
- garlic powder/ granulated garlic
- paprika
- avocado oil (or you can use coconut or canola – something with a high smoke point)
- onion (optional)
- lemon (optional)
- 1 cup chicken stock, broth or water
Preparing the whole chicken
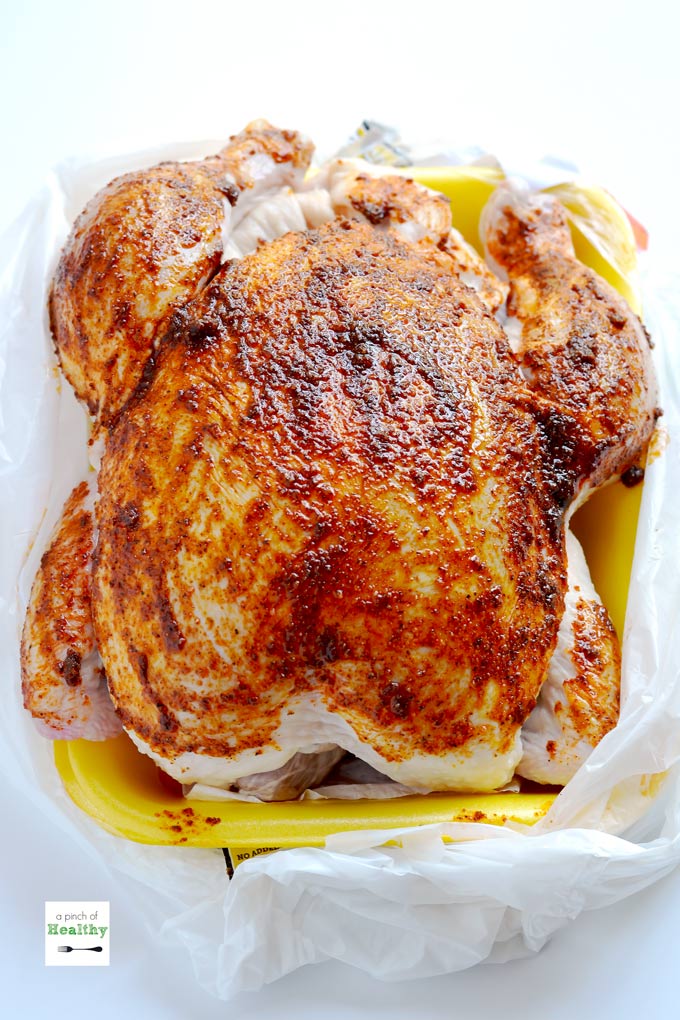
First, remove all parts from the chicken cavity; rinse and pat dry with a paper towel. Optional: place the onion and lemon in the cavity of the chicken.
Combine all of the spices, including salt and pepper, in a small ramekin dish; stir together.
Add the oil to the spices, and stir until incorporated.
Cooking Instant Pot rotisserie chicken
Turn on your Instant Pot to preheat on the sauté setting. Rub half of the oil and spice mixture on the breast side of the chicken.
Place the chicken, breast side down, in the preheated Instant Pot. Carefully rub the other half of the oil and spices mixture on the other side of the chicken.
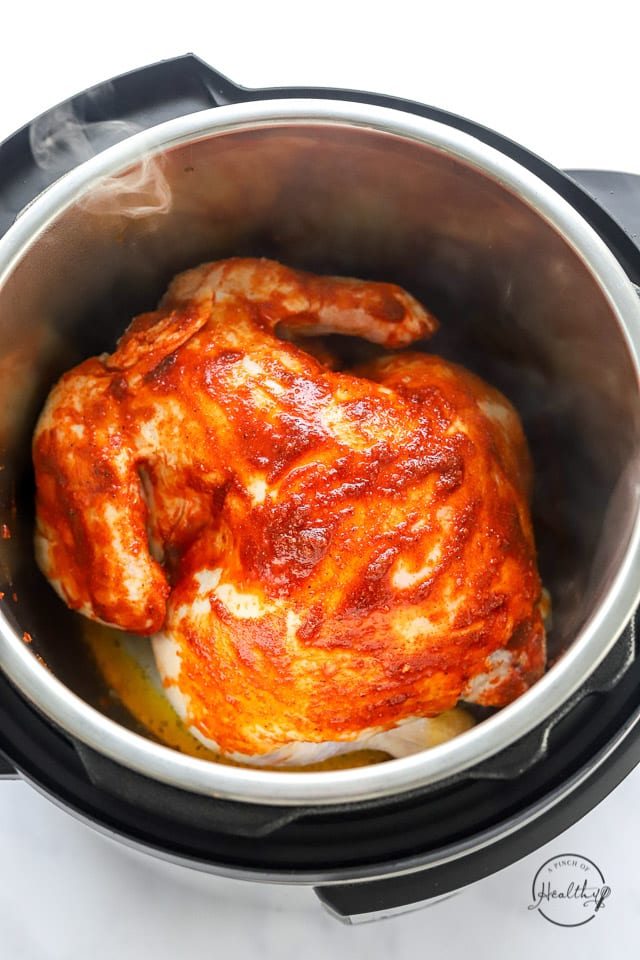
Allow the breast side to crisp up the chicken skin for a few minutes, about 3 to 4 minutes total. Carefully flip the chicken over to the other side, and let it crisp up the skin on the other side for about a minute.
Flipping it over was a little awkward, but it helps to use a sturdy burger flipper and some tongs.
Optional step: If you do not want your chicken sitting in the liquids, you can remove the chicken after it browns on the second side and place the trivet in the pot. Then place the chicken, breast side up, on the trivet.
Next, add in the chicken stock. Place the lid on and lock it, per Instant Pot instructions. Set to high pressure for 25 minutes.
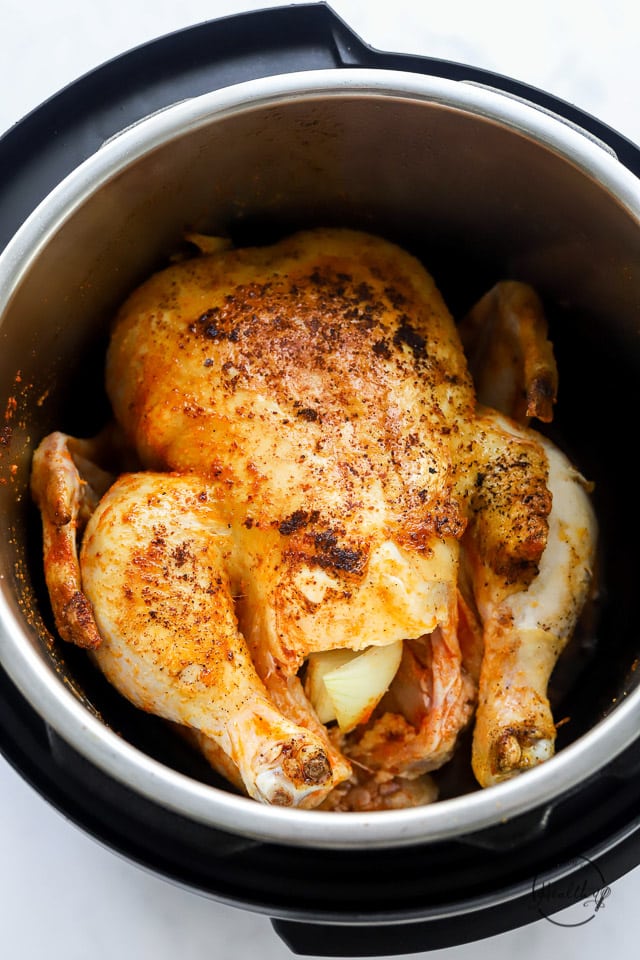
Allow the Instant Pot to depressurize naturally (I.e., do not use the venting lever, but allow the pressure to dissipate slowly. Mine took about 15 minutes.) Remove the lid, and transfer the chicken to a serving plate. Mine was so tender that it was falling apart a little!

Let the chicken rest for about 5 minutes prior to serving. I like to spoon or brush a little of the cooking liquid over the top just prior to serving to make the chicken extra juicy.
If you do not have an instant pot, this recipe should still work in a large stovetop pressure cooker.
Update: I have added an additional (optional) step to this recipe. If you do not want your chicken sitting in all the liquids, you can remove the chicken after browning the second side. Then add the liquids and trivet, and return the chicken (breast side up) to the pot.
Our family loved the original recipe, and it certainly was easier just to leave the bird in the pot and pour the chicken stock right in. But this extra step may be worth it to you if you don’t want the underside of your chicken sitting in liquid.
Helpful hint: Don’t throw away the liquid or the bones. Use it to make chicken bone broth.
FAQ’s About Instant Pot Whole Rotisserie Chicken
Can I use a frozen whole chicken?
Several people in my audience have had success using frozen chicken. When I have tested this myself, I have had mixed results. So for best results, I recommend using fully thawed chicken.
Can I add vegetables or rice to the pot to cook with the chicken?
I would not recommend rice, since the cook times don’t match up. Your rice would most likely get very mushy. One vegetable that I have had luck with are small/medium red potatoes. The trick is to fit them around the chicken. They will get really soft, but they are still good. Larger/ thick carrots may work okay too. Everything else I have tried gets too mushy.
Can I make this without stuffing the cavity with lemon and onion?
Yes, I do this all the time. It is still really tasty.😋👌🏻
Do I need more liquid if I am making this in an 8 quart model?
Yes, I would recommend the minimum liquid requirement for this model, which is 1.5 cups of liquid.
Why don’t you use the “poultry” button for this recipe?
I use manual high pressure for most of my Instant Pot recipes. Honestly, I have tried the other buttons and have not noticed much of a difference. 🤷🏼♀️
More Instant Pot Recipes You May Enjoy
- Instant Pot “baked” sweet potatoes
- Instant Pot classic beef chili
- Instant Pot red beans and rice
- Instant Pot chicken breasts
- Instant Pot chicken thighs
- Instant Pot pasta e fagioli soup
- Instant Pot hard boiled eggs
- Instant Pot spaghetti (one pot)
- Instant Pot chicken recipes
- Instant Pot oatmeal (pot in pot method)
👉🏻👉🏻See ALL of my Instant Pot recipes here.👈🏻👈🏻
Tools Used to Make Instant Pot Whole Rotisserie Chicken
Note: These are Amazon affiliate links.
- Instant pot electric pressure cooker
- Measuring spoons
- Small bowl or ramekin for mixing spices & oil
- Tongs and burger flipper for flipping over the chicken
- Meat thermometer to check internal temperature
Instant Pot Whole Rotisserie Chicken Recipe
Did you try this recipe? Give it a star rating. Pin it and share it if it looks good to you. And be sure and stay connected on social media!
Instagram | Pinterest | Facebook | YouTube | TikTok
Be sure and check out all my favorite kitchen tools in my Amazon store (affiliate).

Instant Pot “Rotisserie” Chicken
Ingredients
- 1 whole chicken mine was 4.3 pounds
- 1 and 1/2 teaspoons salt
- 1/2 teaspoon pepper
- 1 teaspoon granulated garlic
- 1 teaspoon paprika
- 1 and 3/4 Tablespoons avocado oil (or you can use coconut or canola – something with a high smoke point)
- 1 yellow onion quartered (optional)
- 1 lemon halved (optional)
- 1 cup chicken stock or broth
Instructions
- Remove all parts from the chicken cavity; rinse and pat dry with a paper towel.
- Optional: place the onion and lemon in the cavity of the chicken.
- Combine all of the spices, including salt and pepper, in a small ramekin dish; stir together.
- Add the oil to the spices, and stir until incorporated.
- Turn on your Instant Pot to preheat on the sauté setting on “normal.”
-
Rub half of the oil and spice mixture on the breast side of the chicken.
- Place the chicken, breast side down, in the preheated Instant Pot.
- Carefully rub the other half of the oil and spices mixture on the other side of the chicken.
- Allow the breast side to crisp up the chicken skin for a few minutes, about 3 to 4 minutes total.
- Carefully flip the chicken over to the other side, and let it crisp up the skin on the other side for about a minute. Flipping it over was a little awkward, but it helps to use a sturdy burger flipper and some tongs.
- Optional step: If you do not want your chicken sitting in the liquids, you can remove the chicken after it browns on the second side and place the trivet in the pot. Then place the chicken, breast side up, on the trivet.
- Add in the chicken stock.
- Place the lid on and lock it, per Instant Pot instructions.
-
Set to manual high pressure for 25 minutes.
- Allow the Instant Pot to depressurize naturally (I.e., do not use the venting lever, but allow the pressure to dissipate slowly. Mine took about 15 minutes)
- Remove the lid, and transfer the chicken to a serving plate. Mine was so tender that it was falling apart a little!
- Let the chicken rest for about 5 minutes prior to serving.
- I like to spoon or brush a little of the cooking liquid over the top just prior to serving to make the chicken extra juicy.
Recipe Notes
* 40 minutes includes time for the Instant Pot to naturally depressurize.
Cooking time may vary slightly if your chicken is much different in size than this one, which was 4.3 pounds. Use a meat thermometer if you are unsure, just to be safe! Internal temperature for chicken should be 165 degrees Fahrenheit.
Nutritional information is approximate and was calculated using a recipe nutrition label generator.

See ALL of my Instant Pot recipes here.
Note: Instant Pot rotisserie chicken originally appeared on A Pinch of Healthy September 27, 2016. It has been updated with new photos. Here is what it used to look like.


TripMan says
Ok I tried a couple of these whole chicken recipes and this is by far the best one. It was delicious and moisty inside. I’ve tried different ones where they also incorporate liquid but for some reason this was better. I didn’t have lemon or onion but I did stuff it with a lot of garlic and wow it is good. Saved this page for Saturday and future uses
Marjorie@APinchOfHealthy says
Yaaay! I am so happy to hear that! Thank you for that feedback.💖
Alice Benham says
I’m late to the Instant Pot game, but I made this tonight, and everyone loved it! Thanks for posting!
Marjorie@APinchOfHealthy says
Yaaaay! 👏🏻 I am so happy to hear that Alice.
Nadine Robinson says
I’m a relatively new instant pot owner, and tried to set it for manual 25 minutes, but could only do 20 minutes… not increments of 5. Any thoughts?
Marjorie@APinchOfHealthy says
Hi Nadine. Use the plus and minus buttons to adjust the time. It should go in one minute increments. Good luck! Hope that helps.
KonaKathie says
“leftover” wine? What IS that? 🙂
Marjorie@APinchOfHealthy says
Hahahaha🤣
Marjorie@APinchOfHealthy says
Thanks for that feedback Curtis! You may have already done this…One way to speed up would be to leave it on sauté all the way up until the time it is to put it on pressure. OR use warmed (microwaved) water or broth to put in the bottom of the pot. Heated liquid will come to pressure a little quicker. Hope this helps!
Rebecca Nation says
I have never made a correct whole chicken ever. Either it isn’t good enough or I over cook it. This was PERFECT! I didn’t get the crispy skin, but no one eats it anyways.
Marjorie@APinchOfHealthy says
Yaaaay! 👏🏻 So happy to hear that Rebecca! The skin won’t get truly crispy in a pressure cooker, since it is a wet environment. But browning the skin does help, and it locks in all those juices. I am so glad you liked it! And thanks for taking the time to leave that feedback. 💖
Laedy Craig says
Trying my brand new insta pot with this recipe right now. Never owned any kind of pressure cooker in my life.. Not nervous.. nope. 😀
Thanks for the recipe!
Marjorie@APinchOfHealthy says
LOL😂 I hope it turned out well for you! 💖
NvrRelctEny1 says
Please stop with the background music. Although lovely and lilting, your creamy voice is drowned out and is difficult for me to pick out certain words. Thank you for you wonderful effort. I enjoy your work!
Marjorie@APinchOfHealthy says
Noted✅
Paula Crawford says
Is this done in the 6 qt instant pot?
Marjorie@APinchOfHealthy says
Hi Paula! Yes, both of mine are 6 qt Instant Pots.
newcook says
My whole family liked this a lot. The only thing I could say is, if you have any chicken skin sticking to the bottom of the pot, you might get the “OVERHEAT” signal if trying to pressure cook immediately after crisping. Also, you end up with a lot more liquid than just the cup of broth – I guess chickens are juicy. Anyway, thanks for providing a really good flavor, as chicken is sometimes bland. The onion, lemon, and spice rub really helped a lot.
Marjorie@APinchOfHealthy says
Yep! Very true, you don’t want a scorch error. And yes, the chicken is juicy and gives off more juice when it cooks. You can always put the chicken up on a trivet, which would keep it out of the juice as much. Glad y’all enjoyed it!